Introduction to DCI STEM & littleBits

What is DCI STEM?
Introduction to the DCI STEM Program:
This program is designed for you to explore all sorts of Science, Technology, Engineering and Math (STEM) topics, discover what interests you, and learn to bring your ideas to life though building different inventions.
Let’s Get Started!
- Make sure you have your littleBits kit! This kit is made up of electronic building blocks called littleBits that you will use to invent with during the program.
- Open your kit so all of your pieces are nearby
DCI STEM Program Overview
This program has 12 projects. In each project you will be inventing with littleBits. We want you to walk away with confidence and ideas for what interests you in STEM.
We have some really fun projects for you coming up. Today will be an introduction to littleBits. In upcoming projects, you will also build electronic robot arms, arcade games and more!
Let’s dive into learning about littleBits!
Introduction to littleBits
Introduction Video to littleBits:
Watch the video below to learn more about your littleBits kit!
littleBits are electronic building blocks that snap together to turn ideas into inventions!
Think about all the ways in which you use and rely on electronics in your everyday life. Do you turn on a lamp to read? Do you ride in a car or on a bus? Do you use the microwave to cook something?
How would your life be different without electronics?
Inspire
Career Exploration
Explore these two women who have made significant contributions to STEM fields. Please take a few minutes to read their stories in the postcards below and think about the following:
- Can you see yourself in her job?
- Are you interested to learn more about her job?
- What inspires you about this role model?


Download Women in STEM postcards here:
LILLIAN GILBRETH AYAH BDEIR
Create
As you work through the mini-projects below, make sure to review all littleBits diagrams to learn how Bits work and how they relate to the real world. You can also find information about each Bit in the Bit Index.
Complete as many of the 9 mini-challenges as you can!
Watch Intro to littleBits Video Playlist
Watch the video playlist below to learn more about what is in your kit:
- Inventing
- Bit Basics
- Bit Combinations
- Bit Signals
- Bit Components
Build a Series Circuit
You are now ready to make a functioning circuit with the Bits.
Build a circuit that will light the long LED. Identify the green Bits as outputs: these are the “doers” of the circuit. (See below)

Think About it:
- What role does the blue Bit play in the circuit, and how can you tell that it’s powered on?
- What is the role of the green Bit?
- Does the order of assembly matter?
- How do you know that the circuit is working?
- How could you stop it from working?
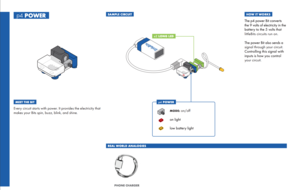
The series circuit is a pathway through which energy can flow in one direction. The circuit has three basic components including:
- power source (the battery)
- conductive pathway (the battery cable and the blue power Bit)
- output (the “doer” of the circuit that’s using the energy, in this case the RGB LED)
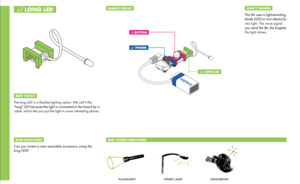
Review Power Bit and Long LED Bit Index Pages together:
See below to learn about how each of the sample circuits were built using the Power Bit and the Long LED Bit:


Make a Connection
When the parts of a circuit are connected correctly, this allows energy to flow from one Bit to the next.
We see this energy as light on the long LED. When you remove one part or change the order of the Bits, you break the flow of energy.
If the parts of a circuit are not connected correctly, then the energy doesn’t have a pathway and that’s when we see the light go out.

Magnets
Look closely at your circuit.
Flip the direction of the output Bit (so either the Bit is upside down or the name of the Bit is upside down in front of them) and see what happens…the magnets push back.
Think About It:
- What happens when you flip the Bit?
- Why do the magnets push back?
- How do you know that you are connecting Bits the right way?
MINI CHALLENGE #1
Build a white reading light using your littleBits that you can use to secretly read books under the covers at night.
Think About It:
- How can you quickly turn it on and off so you don’t get caught?
- Did you connect the Bits correctly to create an energy pathway?
- Can you name the basic components of the circuit?
- Can you provide a simple solution for turning on and off the circuit?
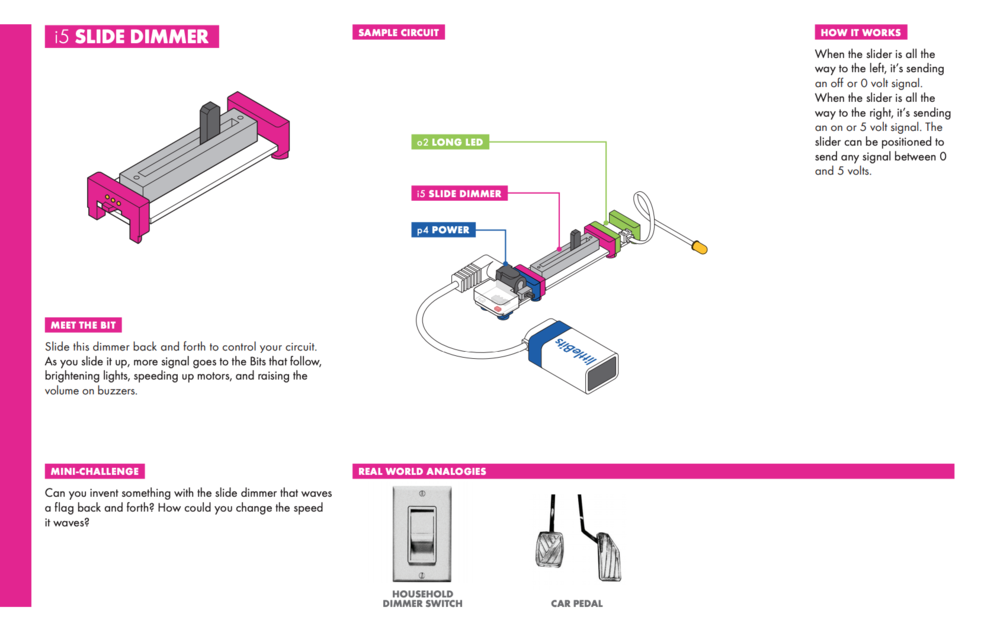
Switch It Up!
Connect the slide dimmer Bit between the blue power Bit and the green LED.
- Turn the power on and describe what happens.
The pink Bits are inputs: these are the controllers of the circuit. They control how the energy flows through the circuit pathway. The “dimmer” controls the flow of energy.
Explore your new circuit. Think about it:
- What happens when you slide the dimmer?
- What is happening to the flow of energy when you slide the dimmer?
- What happens when you move the pink slide dimmer to a position after the green LED Bit?
- What is the role of the pink Bit?
Review Slide Dimmer Bit Index Page
See below to learn how the reading light circuit was created using the Slide Dimmer Bit:
MINI CHALLENGE #2
How could you change the brightness and use it as a dim nightlight when it’s time to go to sleep?
Hint: Use the slide dimmer to control the brightness of the LED.
Think About It:
- Did you identify and connect the slide dimmer Bit?
- Did you arrange the Bits in the correct order?
- Can you explain why you connected the Bits in that order?
- Do you know how the input Bit is controlling the flow of energy through the circuit?
Next, you will continue to build on their inventions by adding additional Bits into the mix!

MINI CHALLENGE #3
Let’s change it up! How could you remix your circuit to create a fire engine siren that makes a noise and lights up?
Hint: Think about how each input Bit controls the flow of energy.
Think About It:
- Which input would work best for a siren?
- Are you remixing the circuit with the slide dimmer and buzzer Bits?
- Can you explain why the order of the Bits is important?
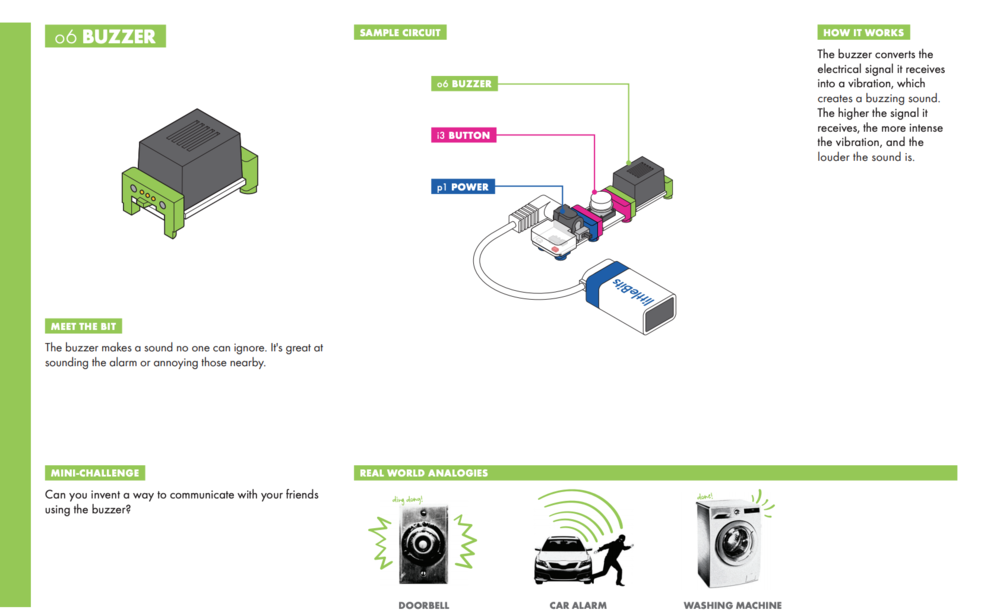
Review Buzzer Bit Index Page:
See below the to learn how the fire engine siren circuit was created using the Buzzer Bit:
Motion & Modes
MINI CHALLENGE #4
Build a musical metronome that can play a beat to help a musician keep time.
A Metronome is a mechanical or electrical instrument that makes repeated clicking sounds at an adjustable pace. This video provides an example: https://bit.ly/2UDICSG.
To make the Metronome you will need to use the Servo Bit. Find the piece labeled Servo in your kit.
- Attach the mechanical arm and use the servo mount to press the servo into a mounting board.
- Hint: Make sure the Servo Bit being used is in SWING mode (flip the tiny black switch).
- Place an object (for example, a water bottle or glass mug) in the pathway of the servo that plays a noise each time the arm strikes it.
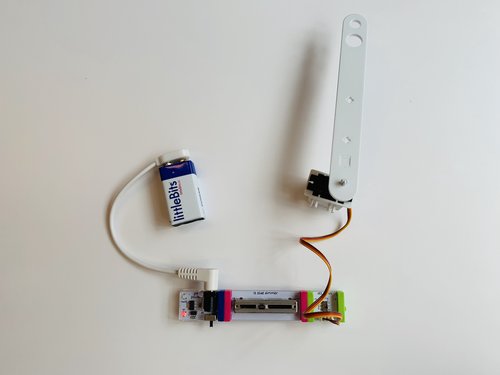
Attach mechanical arm to Servo Bit
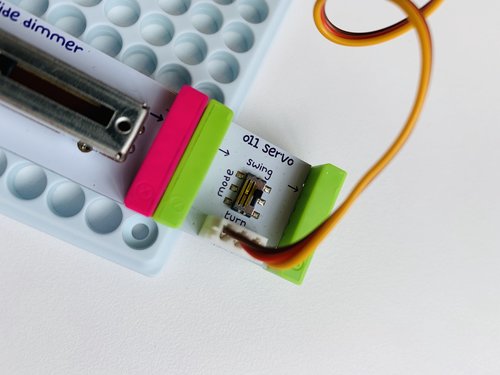
Make sure Servo Bit is set to SWING mode (flip the tiny black switch)
Think About It:
- Is the circuit assembled in a way that it keeps a steady beat?
Review Servo Bit Index Page:
See below to learn how the metronome invention circuit was created using the Servo Bit:

MINI CHALLENGE #5
Improve your musical metronome circuit from Mini-Challenge 4. How could you change the beat to be faster or slower to keep time with your favorite song?
Play music or sing along to the beat.
Think About It:
Hint: Use the slide dimmer to control the speed of the swing. What happens when you switch the servo to TURN mode?
- Can you correctly identify and connect the slide dimmer Bit?
- Can you switch the servo to SWING mode?
- Can you arrange the Bits in the correct order?
- Can you explain why the connected Bits are in that order?
- Can you explain the function of the input Bit in controlling the flow of energy through the circuit?
MINI CHALLENGE #6
Let’s change it up! Can you invent something with the Servo Bit to help clean your desk?
- Are you using multiple input and output Bits on the same circuit?
- Can you explain why the order of the Bits is important?
Sensors & Logic
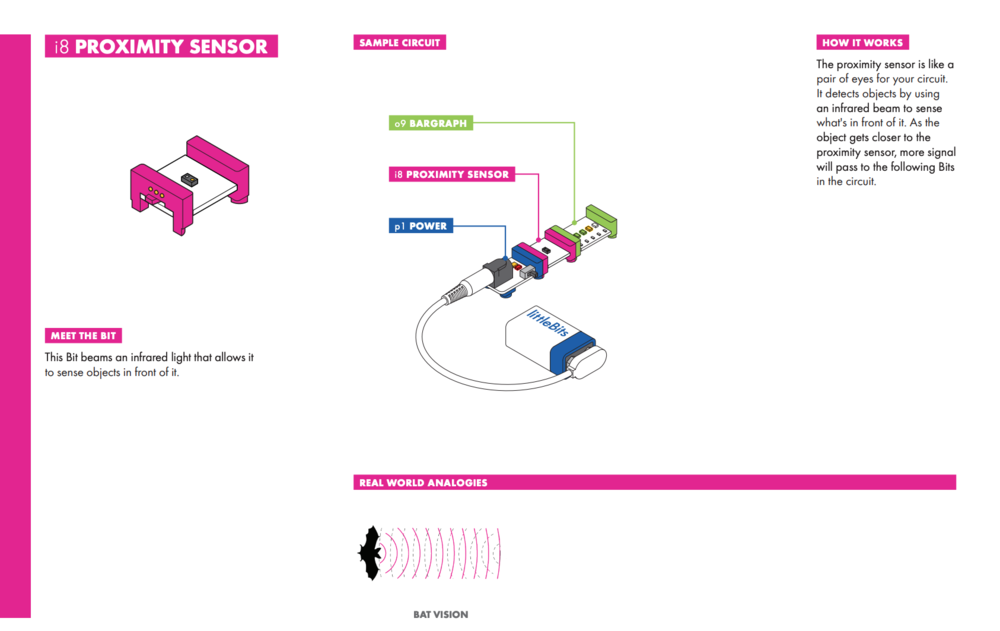
Review Proximity Sensor Bit Index Page:
See below to learn how the sample circuit was created using the Proximity Sensor Bit:
MINI CHALLENGE #7
Imagine that you work for an electronics company that is tasked with building the technology for a smart house.
Our client has several ideas that they’d like us to prototype (Hint: A Prototype means to test or try out a few ideas).
Create an intruder alarm that sounds when someone is close by.
Think About It:
- Can you hear the buzzer when you move your hand over the top of the proximity sensor?
- What happens if you trade out the proximity sensor for the sound trigger?
- Try clapping your hands over the sound trigger and move the sensitivity slider back and forth to see what happens. How soft can the noise be to set off the alarm?
Review Sound Trigger Bit Index Page:
See below to learn how the sample circuit was created using the Sound Trigger Bit:

MINI CHALLENGE #8
The client also wants a lighting system that turns on when someone makes noise.
Think About It:
- Where can you add the Long LED to your alarm so it lights up when you make a noise?
- Can you arrange the Bits in the correct order?
Review Latch Bit Index Page:
See below to learn how the sample circuit was created using the Latch Bit:

MINI CHALLENGE #9
Now, the client wants a little more control over the lighting system. Modify your automatic light to stay on or stay off.
Hint: Make sure you insert the Latch Bit. The picture below is there to help you!

Inspirational Links:
TED Talk: Building Blocks that Blink and Teach - Ayah Bdeir
littleBits Brings STEAM to Life
Resources
Helpful Links:
Snap The Gap STEM Kit Overview