Trash Chomper
Build a garbage eating monster!
As you work through the session, make sure to review all Bit diagrams to learn how Bits work and how they relate to the real world. You can also find information about each Bit in the DCI STEM STEM Kit Bit Index
Inspire
Career Exploration
Explore these three women who have made significant contributions to STEM fields. Please take a few minutes to read their stories in the postcards below and think about the following:
- Can you see yourself in her job?
- Are you interested to learn more about her job?
- What inspires you about this role model?


Download Women in STEM postcards here:
SALLY RIDE JANE X. LUU VIRGINIA HOLSINGER
INSPIRATIONAL INVENTION VIDEOS OF THE DAY
Turn boring objects like trashcans into smart objects. These trashcans are interactive and help the environment by making it fun to pick up trash and recycle.
A trash can that makes a sound when you throw something away keeps people from littering
A littleBits-Powered Recycling Bin
A smart recycling bin that turns recycling into a game
Create
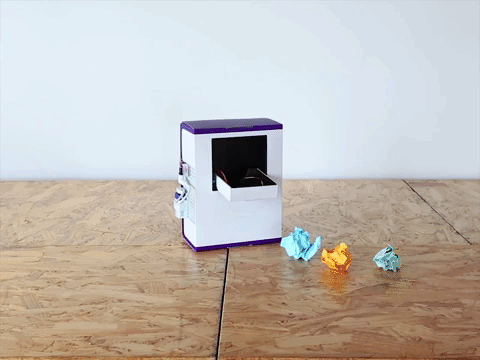
The Trash Chomper
Build a garbage eating monster.
CREATE: Watch the following video playlist below for the building instructions to create the Trash Chomper:
-
Robots
-
Create Trash Chomper

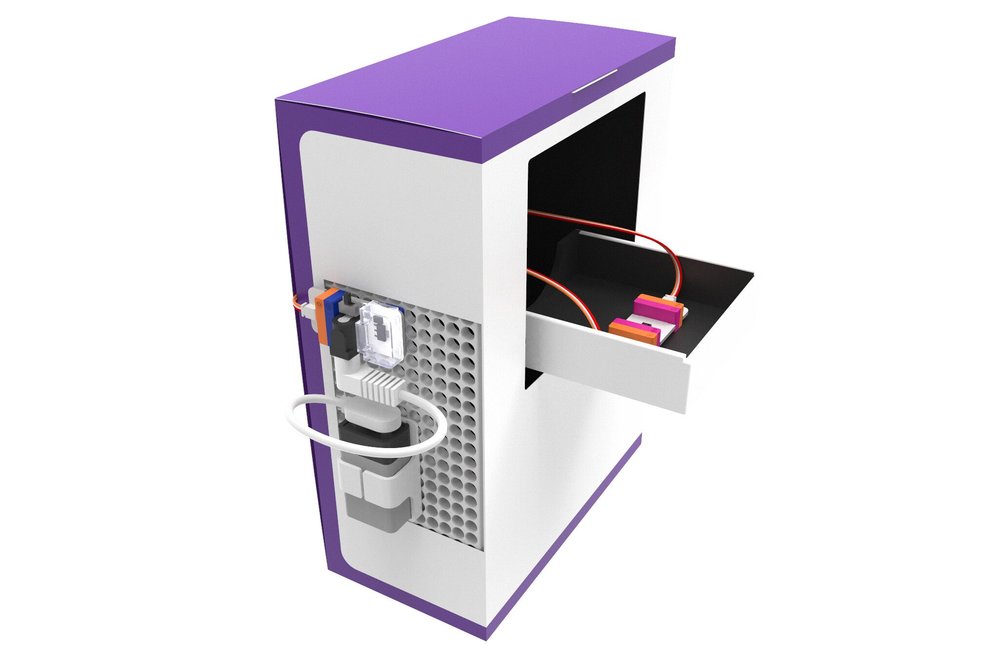
CREATE: View the following photo slideshow on how to build your Trash Chomper invention.
-
Building your Template
-
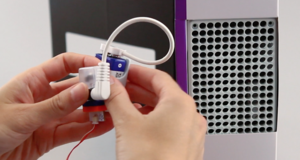
Building your Circuit
-
Building your Invention


Play
PLAY: Try out your invention!
Once you have been built your Trash Chomper invention, test it out to make sure it works.
-
Does the Proximity Sensor Bit sense when you throw something in your Trash?
-
Does the Trash Chomper quickly chomp the trash away?
-
Keep in mind that the first prototype likely won’t work perfectly the first time; failure is part of the process.
Remix
Remix: Update or Improve your Prototype
How can you use Bits and craft materials to improve or customize your invention?
Here are some ideas:
-
Try using your Trash Chomper in different places/scenarios:
-
Can it be used for something other than trash?
-
Can it be a secret compartment? A piggy bank? A pet food dispenser? What other ideas do you have?
-
-
What happens if you turn it upside down or on its side?
-
Does that change how it works?
-
-
-
Experiment with Bits:
-
Try swapping the Sound Sensor Bit in place of the Proximity Sensor Bit.
-
How does this change the function of your Trash Chomper? Hint: Try clapping to make it chomp.
-
-
Try adding other Bits.
-
What happens if you add a Long LED Bit or a Buzzer Bit? How could this improve your invention?
-
-
-
Add Other Craft Materials
-
How can materials transform your Trash Chomper into something else like a mailbox or a pet feeder?
-
Use stickers or add other craft materials and get creative.
-
-
Give your invention some personality - does it look like an animal? A plant?
-
Add a sign or message
-
SHARE: Share your invention with friends or family!
Here are some ideas how you can share about your invention:
-
Create a story about your invention.
-
Talk about the updates or unique features you added to the original prototype and why you decided to make these changes.
-
Snap photos of your final invention and send to your site coordinator!
Share
CONGRATULATIONS, YOU HAVE COMPLETED THE PROJECT!
Resources
Inspirational Links:
littleBits Powered Recycling Bin
Helpful Links: